3.31.2014

CWTS Voting Week 2 and Mount Vernon

CWTS logo A
                       week2 cropped
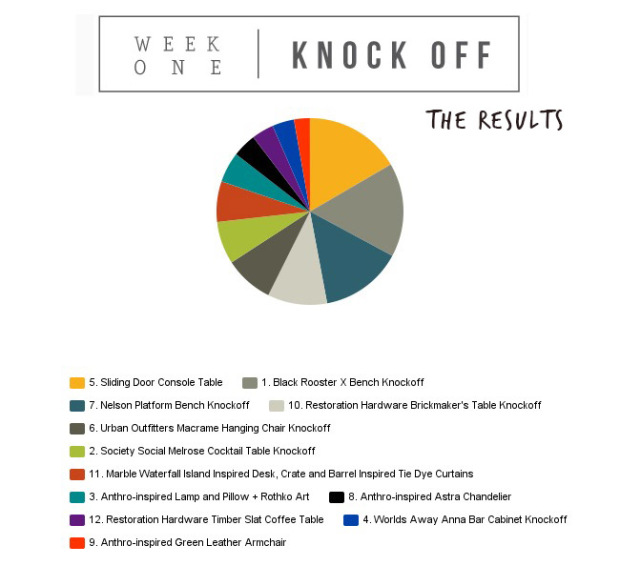
I turned in my second project for the East Coast Creative Contest. You can go HERE to vote for your favorite PAINT project. The voting is open Monday and Tuesday and you only have one vote (that's the tricky part because its hard to choose). I'm so pleased with the way the my paint design came out. I'll let you know which one is mine on Wednesday.


Speaking of paint, I was completely inspired by a historical home I visited last week. I went to George and Martha Washington's home, Mount Vernon, on a field trip with my daughter's class. Mount Vernon is one of my favorite historical homes and I couldn't pass up a field trip there! The day we went it was drizzly with rain and chilly (note: go to Mount Vernon when it's a warm sunny day, you'll be much happier).

I absolutely love touring historical homes. There is much to learn about design and architecture. Even celebrities today are influenced in design by historical homes like Rob Lowe and his wife designed their California home to look similar to Mount Vernon.
Rob Lowe
                                                                       Architectural Digest
I wasn't allowed to take pictures inside because it is a preserved home. However, I gathered some examples of some of the bold painted rooms to show you just how timeless these styles still are today. In the 18th century, it was a sign of wealth when you used bold colors in your home. Thank goodness paint is more affordable in our day.

Talk about a 'wow' effect with varying shades of turquoise and green in the grand dining room. The Washington's hosted many people in their home and I imagine they used their dining rooms often. Washington said about his home, that it was a "well resorted tavern."

The parlor has some of the best examples of colonial Virginia architecture (the columns lining the door and the fireplace mantel) and was painted in a "fashionable Prussian blue."

The smaller dining space is a bright green with gold frames. The picture doesn't show underneath the table is a black and white checkerboard inset.

The library might not be considered bold, but it is warm with the honey colored wood and a black door, which looks classic.

                                         (All interior photos via)
Aren't these rooms gorgeous? I know I'm inspired to be more bold with my paint. How about you? Have you gone bold in a room in your home?

3.26.2014

We Made It To Round 2


A BIG THANK YOU to all of you who voted for our Society Social Melrose Cocktail Table Knockoff! We made it into Round 2 of East Coast Creative's Contest Creating With The Stars! The table we (my hubby and I) made came in at #6! I promise to give you a full tutorial on how we made it on the blog when the contest is over. Let me just say, it was a busy week and some real late nighters, but it came out so beautiful! Also, its wonderful being mentored by one of the best DIYers out there, Kate, from Centsational Girl. The other submissions were completely creative and amazing. Here are the results of the Knock Off portion of the contest:
Round 1 Results CHART
                                                                           EC2
I'm the lime green pie! This week's project is 'Paint' so it's going to be fun to see what the nine of us come up with for this round. The voting for the 'Paint' category will begin on Monday. Don't worry, I'll remind you to vote. Wish me luck!

*********UPDATE************
If you want the tutorial on how we made this beauty check it out HERE.

Stay connected

3.24.2014

Art By Way Of Glue Gun and Creating With The Stars: Round 1

Sometimes all you need to make unique art is use a glue gun and found objects. This little agate art is a favorite of mine. My girls and I bought these at the National Natural History Museum in D.C. They had so much fun picking out different little colored stones and agates. Now it can be displayed in our home. (The table is a great thrift store find with a marble top!)
Every summer we collect shells and sea glass at the beach. Again, it was easy to use a glue gun to stick all the shells onto a linen backing and frame it. 
                                             
                                                                       via
You don't even need a fancy big glue gun. I get the cheap ones and they do the trick.

 Part of making a gallery wall for our home is putting up art that has meaning. I made this simple L shape out of buttons and hot glued them down to the linen backing. Voila! Instant art gratification!

One more thing.................

CWTS logo A
                     week1 crop

I've been pretty busy this past week working on my secret knock-off project for Creating With The Stars Contest. I can't tell you which one is mine, right now, since the contest needs to remain anonymous. You can go to East Coast Creative blog to vote for your favorite knock off project. The voting is open Monday and Tuesday and they will announce the winners on Wednesday. I can't wait to show you mine! This contest is super huge and I'm crazy excited to be a contestant.


3.19.2014

Giveaway Winner!


Thank you for everyone who signed up for my first Giveaway! (I randomly drew a name the old fashioned way using an excel spreadsheet- I know so glamorous!) The Handmade Home art books are a dream and the lucky winner of all three books:

The winner is....
Treesa!
Treesa, you'll be hearing from me! Congratulations!


On a side note: I've been working on my first project for Creating With The Stars (CWTS) contest! You guys, I'm so excited!  My first project, "a knock-off" is due Saturday and they'll be showing the top twelve contestants' projects on Monday on East Coast Creative. To level the playing field, each contestant needs to remain anonymous, so you won't know which project is mine, but you can vote for your favorite projects. Oh, and how amazing is it that I'm being mentored through this whole contest by none other than Centsational Girl! This girl has a great eye for design and is an DIY expert.
4 CWTS Team

I had little helpers at the paint store with me the other day. My love for paint samples is being passed onto my girls as they help me get ready for my projects. Can't wait to show you the things going on here! 

3.17.2014

Creating With The Stars

                                contestant
I woke up this snowy (yes, it snowed here again!) Saint Patrick's morning to find I made it into the East Coast Creative's Contest: Creating With The Stars (CWTS)!! I'm also paired up with one of my favorite bloggers, Kate, from Centsational Girl! What the what?!  I'm thrilled and grateful for the opportunity to do some projects and be in this contest with some amazing bloggers. This contest is four weeks long and consists of  four projects to accomplish. Week one is a knock-off project. Come back to see what I've been up to.

Since it's Saint Patrick's Day and my children are home from school due to snow(yes, they've gone way over their snow days limit) we'll be making some green-related treats like this Shamrock shake and rainbow art with pots of gold.
                                    Healthy Shamrock Shake & Healthy St. Patrick’s Day Recipe Recap | Peanut Butter and Peppers
                                                                         via

                 Don't forget to sign up for my first art books Giveaway which ends on Wednesday.
                                                                 Stay connected:

3.14.2014

Design Inspiration Friday: Spring Mint

Spring Mint


One of my favorite colors is mint and it looks good on or in a room, especially for Springtime. Don't you feel we all need a little pop of color after winter? I think I really need mint running shoes too (maybe that would get me to run faster). What say you, do you love mint? Here are some favorite mint inspired items I'm loving:
                                                              chair / pillow / boxes
                                                         wallet / cake stand / watch
                                                        flower print / scarf / earrings
                                                            Ikea cart /running shoes
Also, don't forget about the art books Giveaway- it's open until Wednesday, the 19th. Hope you all have a lovely weekend!
                

3.12.2014

Art Books Giveaway!!!

You guys, I'm so excited to have my first Giveaway on the blog!!! I recently was sent some books to review and thought they would be perfect for you wonderful readers and supporters of my blog.  Jamin and Ashley Mills from the Handmade Home have curated three lovely art books, Art for the Contemporary Home, Art for the Eclectic Home and Art for the Traditional Home. Their selections are beautiful and can be taken out of the book to frame.  It's hard for me to say which one is my favorite, because I loved the art from each book, and I think you will too. Here is a peak of some of the pages:
I could see these prints in a darling child's room. 
                                      Wouldn't these look amazing on a gallery wall somewhere?
Excerpted from Handmade Walls: 22 Inspiring Ideas to Bring Your Walls to Life Copyright © 2013 by Jamin and Ashley Mills (thehandmadehome.net) and published by F+W Media, Inc. Used by permission of the publisher. All rights reserved.
If you need more art in your home (and who doesn't?) then I highly recommend these gorgeous books that would be easy to take out and frame.

 To enter the Giveaway: All you need to do is comment and tell me what would be your favorite style of art: Traditional, Contemporary, or Eclectic. One comment per entry. One winner will be chosen at random and will receive all three books! Make sure your comment is not a "non-reply" or else I won't be able to get in touch with you. 

For additional entries:
2. Follow me on Google Connect or Bloglovin
3. Follow me on Instagram
4. Like me and follow me on Facebook (I finally started a page for my blog!)

Good luck! The winner will be announced March 19.

***********This Giveaway is now closed.****************

3.11.2014

Building A Frame

Yesterday, I showed you this big frame the hubs and I made for our daughters' room. We received The Handmade Walls 22 Inspiring Ideas to bring your walls to life, from the Handmade Home publisher. We decided to make the 'Wills' frame since it's of grander size and I knew I wanted something larger over our the dresser in our twins' room.
Excerpted from Handmade Walls: 22 Inspiring Ideas to Bring Your Walls to Life Copyright © 2013 by Jamin and Ashley Mills (thehandmadehome.net) and published by F+W Media, Inc. Used by permission of the publisher. All rights reserved.
The material list for this frame is shown in the book. We bought 1"x3" pine boards from Home Depot. 
We started out cutting each of the pieces as shown in the the book. One piece of advice is to stack the four boards (for one square and make your two 45-degree cuts at the same time). This ensures all sides of your square are exactly the same. 
Instead of using the 90-degree corner brackets, we used wood glue and a brad nailer to assemble the four sides of each square. Since we cut all four sides at the same time, the corners were super-tight. 

We used a scrap piece of 3/4" birch plywood (leftover from our library bookshelves) instead of the MDF recommended in the book. We laid out the center square cut-out as recommended in the book. Instead of plunge cutting with a skill saw, we cut holes using a hole-saw and then used a jig saw to cut out the rest.
We used screws and wood glue to assemble the squares, white (primed and painted) backing boards, and frame.
The frame was built so that there would be 1" spaces between each square. To maintain an equal spacing, we cut 1" blocks out of scrap wood and put them between the squares while we assembled the parts.

Overall, this frame was a great D.I.Y project which took us a little over an hour to cut and assemble. After the frame was complete I did a light stain on top of the wood. The next day, I used good old frog tape to make my designs for the corners and used Rub N' Buff in Antique gold (same tube that I used for my sconces- that stuff just keeps going!).
We love how it turned out! Thanks Handmade Home for inspiring ideas in your lovely book. 

Just a side note if you've read this far: I entered a contest that East Coast Creative is putting on called
  Creating with the Stars. It's a HUGE contest with four challenges for only twelve top bloggers. I entered our library bookshelves 
(linked up to #84) please go see it. The more popular the project, the better my chances are for being a contender! Thank you so much! Come back tomorrow, I am having my first GIVEAWAY!! 

3.10.2014

Framed!


Hope you all had a great weekend! I want to show you this big ol' frame the hubs and I made. We had some good directions from D.I.Y rock stars and artists, Jamin and Ashley Mills of the Handmade Home. Their publisher sent me some of their books and I thought it would be fun to make some frames from the book to see how easy/difficult it really was to make. 
Excerpted from Handmade Walls: 22 Inspiring Ideas to Bring Your Walls to Life Copyright © 2013 by Jamin and Ashley Mills (thehandmadehome.net) and published by F+W Media, Inc. Used by permission of the publisher. All rights reserved.
 In the book, there are thirteen examples of frames rated easy to difficult. There is a supply list, cut list and cost estimates for each project. They have come up with some unique D.I.Y frames that really could change the way you design or decorate a room. They are all beautiful! When Steve and I saw the 'Wills' frame, we knew that was the one we wanted to make. It's a statement piece.

  
 We put the 'Wills' in our twins room since I knew it would look a bit grander than what they had up there originally.
 Here's what the twins' room looked like not too long ago (with the silly girls striking a pose).
We used to have two lamps and because there was an accident (no names shall be mentioned in this post) we are down to one. This room needs more lighting at night so now I'm searching for two matching lamps again. 
I thought this photo of our girls would be perfect in the frame. Our dear friend Ashley Anderson (Unfortunately, she's overseas for a few years, we miss her!)took these pictures of them and I adore this one. 
To style their dresser a bit more, I found this pedestal stand at a thrift store and gave it a fresh coat of red spray paint to pop it up a bit. 
The pedestal now houses a plethora of colorful beaded necklaces, of course!
I'll give you directions on how we built the 'Wills' frame tomorrow. We did a couple of things that were slightly different than what they do in the book.  I highly recommend anyone who wants to try to make some unique frames to go out and get it. What do you think- would you build a frame?