8.29.2014

Summer Art Camp

As summer comes to a close (so sad) I thought I would share with you a fun summer tradition. For the past few summers one of my good friends and I put on a Art Camp for our kids, their friends and neighbors. We have loads of messy fun making different crafts, painting and baking. This year we had an older girls group (9-12) and a younger children's age group (5-7). Here's some of the creative things these kids did this summer:
 Painting on canvas is such a treat for these kids. We talked to them about sketching first and then they pick a still life they want to do (or not). These make for great works of art on their walls.
The girls also decorated their own tote bags using fabric or painting on them. My daughter Alison uses hers for her music bag now.
                   We made banners for their bedrooms or for their birthday parties using paper and fabric.
                                          It can get a bit messy when creativity is in the works.
          The older girls did some beautiful watercolors and we taught them about sketching and landscapes.
We had a day for the younger children to learn about Pop Art and showed them some of Andy Warhol's works. The children traced some shapes we had for them like a ducky, ice cream cone, crown, sailboat. etc and we used a grid method to break up their paper. Then they used poster paints to fill up the space. 
 Another activity was watercolor where they learned how to do Pointillism. Pointillism is like Impressionism but with tiny dots to create an image (think- George Seurat). The children used q-tips to create a pointillism effect.
Kids love to decorate cupcakes. They got to decorate a cookie monster and Elmo cupcakes. I didn't get many pictures of these because everything was gobbled up to fast.
 Lastly, we did a spaghetti art throwing day to learn about Expressionism. Think Jackson Pollock and splattering paint. Instead of throwing paint, we had the kids throw painted spaghetti at large pieces of paper to create an expressionist look.
 As you can imagine- it was a lot of spaghetti to clean up. However, they had fun running through the sprinkler at the end to get all cleaned up and I hosed my house down.
We also had lots of little side projects like these where we taught them to blend colors and using the color wheel. Summer is such a fun time to do art projects with kids. We had a great time and I'm sure we'll do more next year. What about you? Any fun art projects you made?

*All images are my own. 

8.25.2014

Blog Tour

Summer is officially over for my kids as of today. They are off to school and full of excitement, and so am I! Actually, I'll miss my crazy bunch of girls, it's really quiet without them. However, I won't be too lonely since we just got a new puppy! Meet Coco- our Jack Russel Terrier mix. Our girls are in absolute bliss (and helping me potty train her).

Throughout blog land there are some fun 'get to know you' blog tours going on. I was asked by Tamara, from 
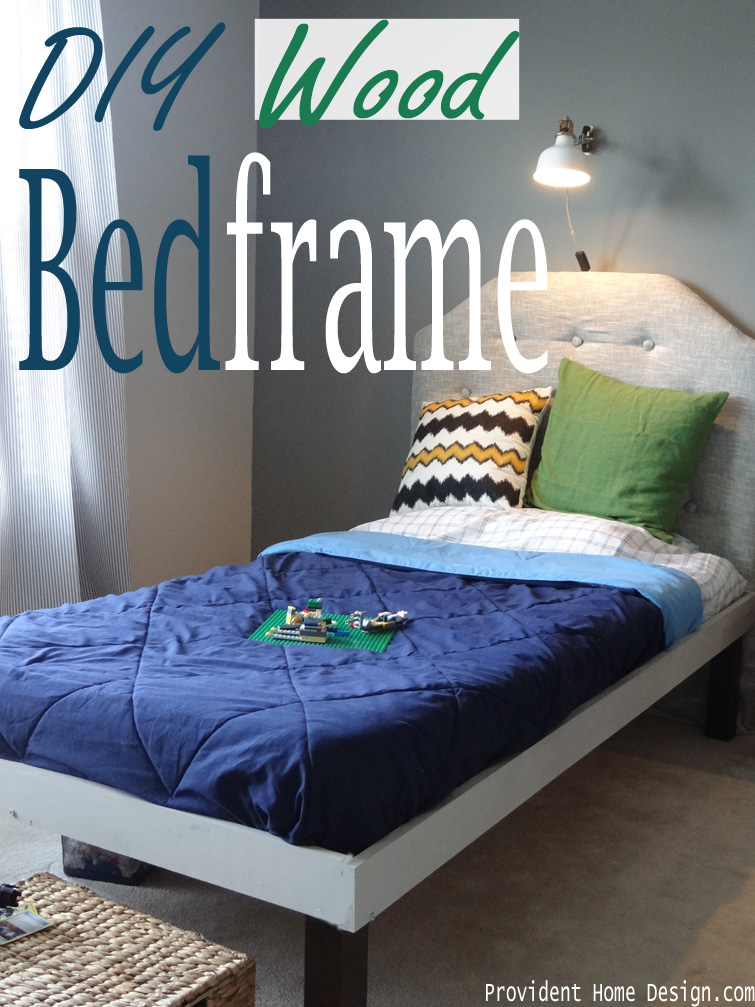
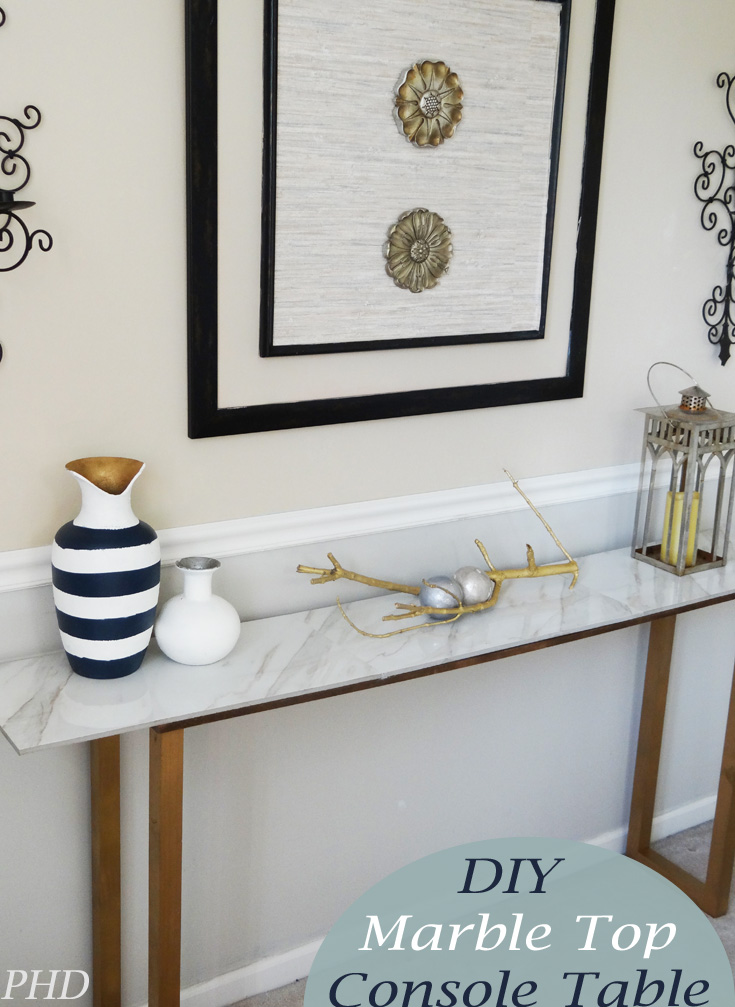
Provident Home Design to join in. Thanks Tamara! Stop on over to her blog to check out her great DIY projects and design ideas. She is a talented lady and made these upholstered bed frames for her boys.

DIY wood bed
And she made this marble console table too...
DIY Marble Top Console Table

Now here are some questions for me to answer in this blog tour:

1.What am I working on right now?
I'm working on a project for Home Depot! (You'll be able to see it in a couple of weeks.) I can't wait to show you the whole thing, but I'm in the middle of it right now. 
I'm also organizing a spot for school papers to come in. Oh yeah!

2.Why do I write/create?
 I started blogging since Steve (my sweet hubby) and I do a lot of our own work for our home. I have loved blogs since I started reading them years ago and found them so inspiring. I want to capture the projects I'm doing in our home and hope it might help someone else or explain how to build something. I also think blogging is a great way for me to get things done. I love home projects and design. Now I create some deadlines for myself. 


3.How does my work differ from others in this genre?
Every blogger and designer is different even if they have similarities. Everyone has their own style. I am interested in interior design, and DIY but also art, gardening, cooking, organizing, thrifting, running, fashion, antiques, art history, historical homes, fabrics, and painting. Yikes- sometimes I feel like I'm interested in too many things! However, it's fun to keep learning. I definitely want to become better at my graphics, design, and photography.

4.How does your writing/creating process work?
There is so much that inspires me: movies, travel, design magazines, bloggers, Pintrest, etc. I'm still new to  blogging so I'm still figuring out my writing style, but I like to keep it brief (unless I need to give a tutorial). I also haven't figured out a regular posting schedule yet. I better work on that one. The creative process is really hard to pinpoint because so much goes into influencing a design or project that it's not just one thing. I studied Art History and worked at some museums and galleries before I stayed home with our children and I feel I learned so much from a museum experience of how things are presented and curated.

5. Here are four blogs I like to read (but there are so many more too)...

I love Kris' blog, Driven By Decor

She has incredible style and elegance in her home. I mean look at that plate wall and this whole room- what a show stopper!

Jennifer, from Decorating Delirium also has some great inspirations and DIY projects on her blog like these pom-pom drapes she made.
Pom Pom Drapes 4

Beth, from Design Post Interiors, has great DIY skills and character in her home with all the things she's sewed and painted.


The other blog that is inspiring is The Makerista, written by Gwen, who has great photography skills and a beautiful eye for all things design in fashion, home, and decor. This is a bathroom that her and her husband recently finished and I can't stop but marvel at the whole thing.

See? So much inspiration! Now go check out some blogs and get going on your next project. 


8.22.2014

Staircase, All Trimmed Out

This summer Steve and I worked on our entry and staircase to give it more character. I started lightening up the staircase by painting the risers white.

We added trim to our stairway and painted it white which made it look like white paneled walls. We also stained the banisters black.

Here's what it looked like BEFORE as I was starting to paint stair risers. It's a beautiful stairwell- it just needed a little oomph!

To stain the banisters, I started by lightly sanding where I wanted to stain (and I mean it was quick- it's just to rough up the wood). After wiping up all the dust, I used green Frog tape to wrap around all the spindles. This part took awhile! I used some cheap throw away brushes to apply Miniwax Polyshades in Classic Black. This product is great because it already has a poly coat in it. The end result was fabulous and required fewer steps than priming, painting, and applying poly.
Once the railings were stained black, I worked on the lower half of the banisters.

Now for the trim!

The trim is 1" x 2.5" pine. We thought this width looked good in proportion to the overall space. We bought 1" x 6" trim and then ripped (cut length-wise) the boards on a table saw.

First, we first laid out where we wanted the trim to go by marking each piece on our walls with a pencil. We tried a couple of different layouts before deciding on a final layout. The shortest section was between the floor and the stair landing. We essentially split that section in half and the space between boards ended up being 22". We used that same spacing for the other two walls. The height of the trim is the same height as the banisters.
Finding the angles between the trim pieces and the inclined staircase was a little tricky. It took some trigonometry to figure it out.   My husband is a math geek so he did this part. Or, you could just cut a couple of scrap pieces until it looks right.

You'll notice the trim is thicker than the baseboard trim so we also tapered those ends with a 45° cut. When the taper was on an incline, we used a compound miter cut.  Once we had all the angles and layout, we cut them on a miter saw.


We used Liquid Nails and a trim nail gun to affix them to the wall.

Once all the trim is up, we caulked where the trim met the wall and we sanded any rough edges. We then painted with one coat of Zinzer water-based primer and two coats of white trim paint.


I still need some art work on that one wall going up, so I'm sure I'll show you what I put up there soon. I'm also probably going to paint the dresser in the corner (still working on that one too).
Here's the back side of the stairwell. 


Everything looks better with some flowers. These lime light hydrangeas have done well this year in our yard and it's fun to bring them in and enjoy them.
The cost of this project was under $100 for the stain, paint, wood, caulking, and glue. Not bad! I really like the white paneled look and it brightened the whole entryway. What are some ways you have found to brighten your entryway?

8.15.2014

The Loft: Before and After


I'm very fortunate to visit Martha's Vineyard every summer. Our family has a home where we gather for great reunions (it's been in our family for several generations now). When I was middle-school age, my parents had a separate garage with a loft built so all my sisters and cousins could have our space. The room evolved over the years from a teenage spot to a nautical inspired guest room. A couple of years ago, my sisters and I did a makeover of this room. We had a lot of fun working together to bring this space from a bit of hodge podge to something with a color scheme. 

BEFORE:
This door is an example of how I painted furniture in middle school. I think it was awfully nice of my parents to let me do that. 
AFTER:
           Now, Benjamin Moore, Paladian Blue paint. Simple.
My sisters and I painted the bed frames a light blue. The white bedding is from IKEA and the stripe pillow and blankets are somethings we sewed. The side table in-between the beds was a brown wood table I painted with Annie Sloan chalk paint (in Paris gray).
The anchor is from Homegoods, which brings in a nautical touch for sure. I painted a racer stripe down the middle of the dresser using ASCP Paris gray. We painted all the trim white and the walls got a neutral color (I forget the name of it right now, so I'll get back to you about it.) It's amazing what the power of paint can do to change a space.
The mirror was also from Homegoods and the coral bookends came from there too. 

Instead of throwing out our old oars away we decided to use them as decoration. Note to self: never throw out any oars- they make really great wall art! The side table is from Target's Threshold line.
I painted this writing desk in a light gray blue. It was a dark wood that was getting a bit destroyed in it's finish, so it looks nice to have it refreshed. 
This chest was my great-great grandfather's! It is super sturdy and a beauty. We have a lot of wonderful family heirlooms in the home- which we love. 

For the bathroom we installed a new vanity, lights, mirror and faucet and a board and batten look. We were about ready to throw out the small shelf, but decided to paint it white and paste a nautical chart we still had.
We framed more nautical charts to fill the small space above the board and batten.
The whole room has a more cohesive feel to it than the 'before' and it's become one of our favorite rooms. We still have a few more things we want to do like paint the window frames all white and do some kind of window treatment, but it's come a long way.
I will show you some more images this coming week of our home on Martha's Vineyard. Hope you all get to enjoy the last bit of summer!